---
title: "AudioLDM 2, but faster ⚡️"
thumbnail: /blog/assets/161_audioldm2/thumbnail.png
authors:
- user: sanchit-gandhi
---
# AudioLDM 2, but faster ⚡️
AudioLDM 2 was proposed in [AudioLDM 2: Learning Holistic Audio Generation with Self-supervised Pretraining](https://arxiv.org/abs/2308.05734)
by Haohe Liu et al. AudioLDM 2 takes a text prompt as input and predicts the corresponding audio. It can generate realistic
sound effects, human speech and music.
While the generated audios are of high quality, running inference with the original implementation is very slow: a 10
second audio sample takes upwards of 30 seconds to generate. This is due to a combination of factors, including a deep
multi-stage modelling approach, large checkpoint sizes, and un-optimised code.
In this blog post, we showcase how to use AudioLDM 2 in the Hugging Face 🧨 Diffusers library, exploring a range of code
optimisations such as half-precision, flash attention, and compilation, and model optimisations such as scheduler choice
and negative prompting, to reduce the inference time by over **10 times**, with minimal degradation in quality of the
output audio. The blog post is also accompanied by a more streamlined [Colab notebook](https://colab.research.google.com/github/sanchit-gandhi/notebooks/blob/main/AudioLDM-2.ipynb),
that contains all the code but fewer explanations.
Read to the end to find out how to generate a 10 second audio sample in just 1 second!
## Model overview
Inspired by [Stable Diffusion](https://huggingface.co/docs/diffusers/api/pipelines/stable_diffusion/overview), AudioLDM 2
is a text-to-audio _latent diffusion model (LDM)_ that learns continuous audio representations from text embeddings.
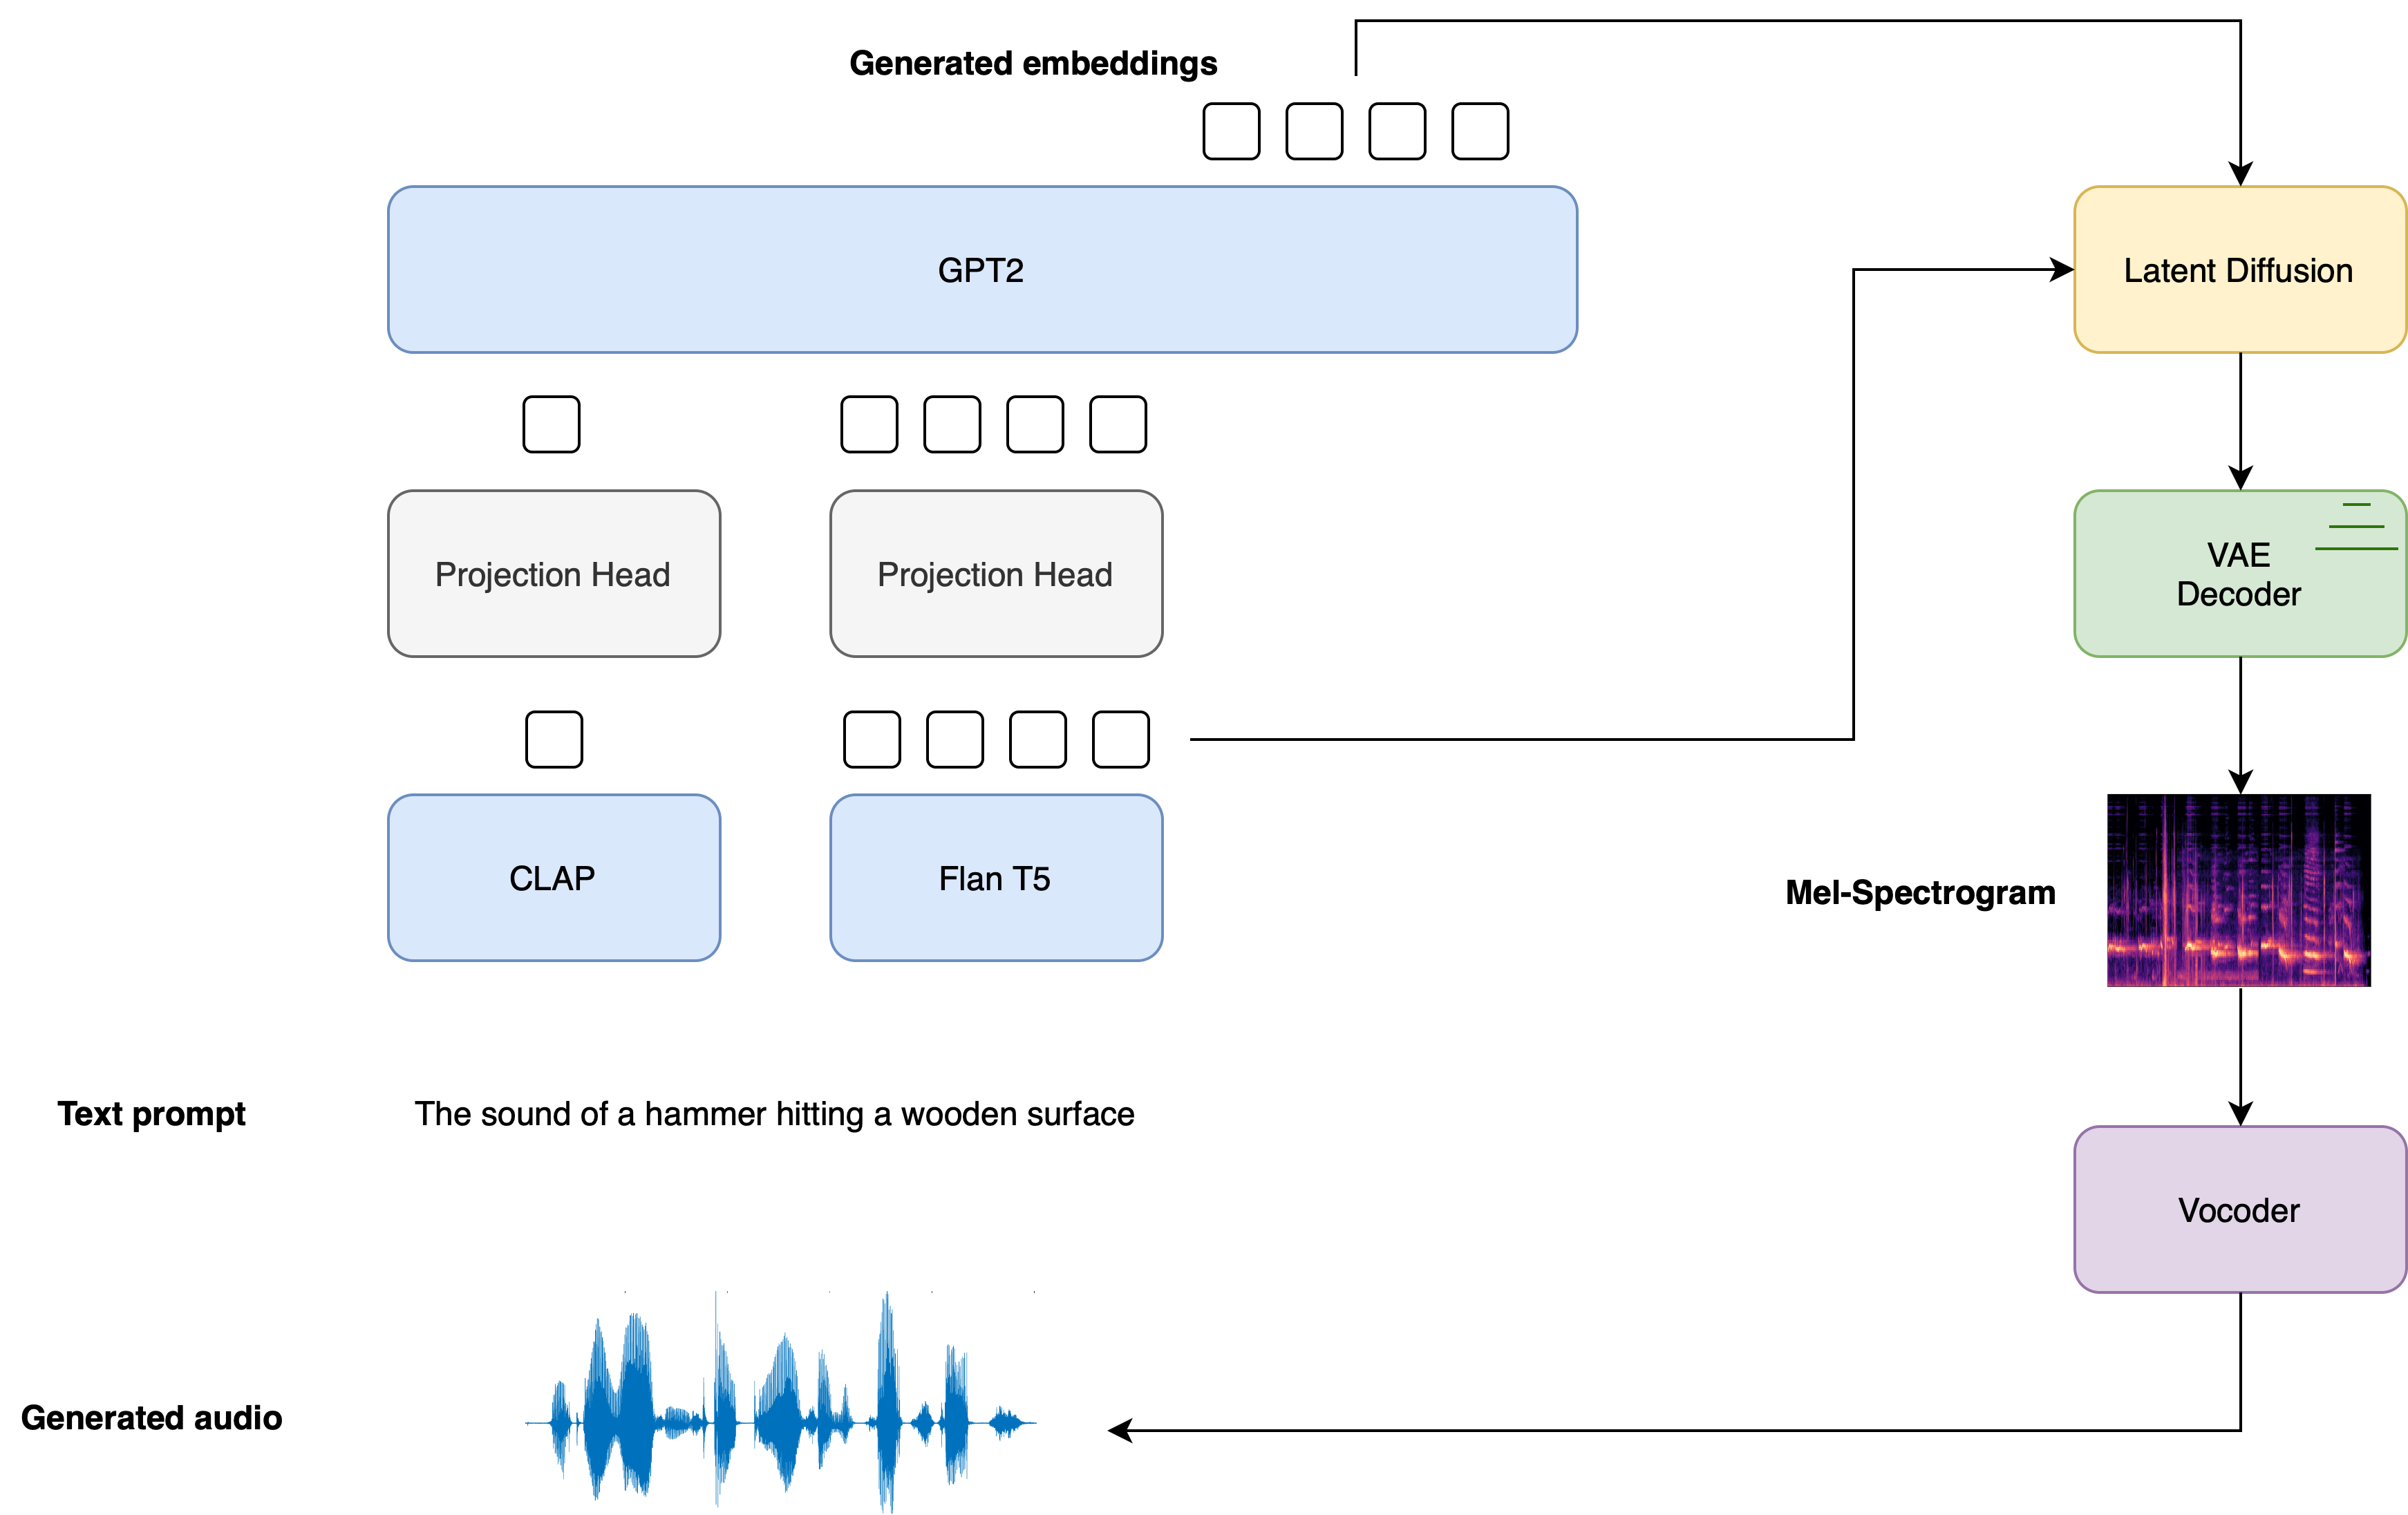
The overall generation process is summarised as follows:
1. Given a text input \\(\boldsymbol{x}\\), two text encoder models are used to compute the text embeddings: the text-branch of [CLAP](https://huggingface.co/docs/transformers/main/en/model_doc/clap), and the text-encoder of [Flan-T5](https://huggingface.co/docs/transformers/main/en/model_doc/flan-t5)
$$
\boldsymbol{E}_{1} = \text{CLAP}\left(\boldsymbol{x} \right); \quad \boldsymbol{E}_{2} = \text{T5}\left(\boldsymbol{x}\right)
$$
The CLAP text embeddings are trained to be aligned with the embeddings of the corresponding audio sample, whereas the Flan-T5 embeddings give a better representation of the semantics of the text.
2. These text embeddings are projected to a shared embedding space through individual linear projections:
$$
\boldsymbol{P}_{1} = \boldsymbol{W}_{\text{CLAP}} \boldsymbol{E}_{1}; \quad \boldsymbol{P}_{2} = \boldsymbol{W}_{\text{T5}}\boldsymbol{E}_{2}
$$
In the `diffusers` implementation, these projections are defined by the [AudioLDM2ProjectionModel](https://huggingface.co/docs/diffusers/api/pipelines/audioldm2/AudioLDM2ProjectionModel).
3. A [GPT2](https://huggingface.co/docs/transformers/main/en/model_doc/gpt2) language model (LM) is used to auto-regressively generate a sequence of \\(N\\) new embedding vectors, conditional on the projected CLAP and Flan-T5 embeddings:
$$
\tilde{\boldsymbol{E}}_{i} = \text{GPT2}\left(\boldsymbol{P}_{1}, \boldsymbol{P}_{2}, \tilde{\boldsymbol{E}}_{1:i-1}\right) \qquad \text{for } i=1,\dots,N
$$
4. The generated embedding vectors \\(\tilde{\boldsymbol{E}}_{1:N}\\) and Flan-T5 text embeddings \\(\boldsymbol{E}_{2}\\) are used as cross-attention conditioning in the LDM, which *de-noises*
a random latent via a reverse diffusion process. The LDM is run in the reverse diffusion process for a total of \\(T\\) inference steps:
$$
\boldsymbol{z}_{t} = \text{LDM}\left(\boldsymbol{z}_{t-1} | \tilde{\boldsymbol{E}}_{1:N}, \boldsymbol{E}_{2}\right) \qquad \text{for } t = 1, \dots, T
$$
where the initial latent variable \\(\boldsymbol{z}_{0}\\) is drawn from a normal distribution \\(\mathcal{N} \left(\boldsymbol{0}, \boldsymbol{I} \right)\\).
The [UNet](https://huggingface.co/docs/diffusers/api/pipelines/audioldm2/AudioLDM2UNet2DConditionModel) of the LDM is unique in
the sense that it takes **two** sets of cross-attention embeddings, \\(\tilde{\boldsymbol{E}}_{1:N}\\) from the GPT2 language model and \\(\boldsymbol{E}_{2}\\)
from Flan-T5, as opposed to one cross-attention conditioning as in most other LDMs.
5. The final de-noised latents \\(\boldsymbol{z}_{T}\\) are passed to the VAE decoder to recover the Mel spectrogram \\(\boldsymbol{s}\\):
$$
\boldsymbol{s} = \text{VAE}_{\text{dec}} \left(\boldsymbol{z}_{T}\right)
$$
6. The Mel spectrogram is passed to the vocoder to obtain the output audio waveform \\(\mathbf{y}\\):
$$
\boldsymbol{y} = \text{Vocoder}\left(\boldsymbol{s}\right)
$$
The diagram below demonstrates how a text input is passed through the text conditioning models, with the two prompt embeddings used as cross-conditioning in the LDM:
For full details on how the AudioLDM 2 model is trained, the reader is referred to the [AudioLDM 2 paper](https://arxiv.org/abs/2308.05734).
Hugging Face 🧨 Diffusers provides an end-to-end inference pipeline class [`AudioLDM2Pipeline`](https://huggingface.co/docs/diffusers/main/en/api/pipelines/audioldm2) that wraps this multi-stage generation process into a single callable object, enabling you to generate audio samples from text in just a few lines of code.
AudioLDM 2 comes in three variants. Two of these checkpoints are applicable to the general task of text-to-audio generation. The third checkpoint is trained exclusively on text-to-music generation. See the table below for details on the three official checkpoints, which can all be found on the [Hugging Face Hub](https://huggingface.co/models?search=cvssp/audioldm2):
| Checkpoint | Task | Model Size | Training Data / h |
|-----------------------------------------------------------------------|---------------|------------|-------------------|
| [cvssp/audioldm2](https://huggingface.co/cvssp/audioldm2) | Text-to-audio | 1.1B | 1150k |
| [cvssp/audioldm2-music](https://huggingface.co/cvssp/audioldm2-music) | Text-to-music | 1.1B | 665k |
| [cvssp/audioldm2-large](https://huggingface.co/cvssp/audioldm2-large) | Text-to-audio | 1.5B | 1150k |
Now that we've covered a high-level overview of how the AudioLDM 2 generation process works, let's put this theory into practice!
## Load the pipeline
For the purposes of this tutorial, we'll initialise the pipeline with the pre-trained weights from the base checkpoint,
[cvssp/audioldm2](https://huggingface.co/cvssp/audioldm2). We can load the entirety of the pipeline using the
[`.from_pretrained`](https://huggingface.co/docs/diffusers/main/en/api/pipelines/overview#diffusers.DiffusionPipeline.from_pretrained)
method, which will instantiate the pipeline and load the pre-trained weights:
```python
from diffusers import AudioLDM2Pipeline
model_id = "cvssp/audioldm2"
pipe = AudioLDM2Pipeline.from_pretrained(model_id)
```
**Output:**
```
Loading pipeline components...: 100%|███████████████████████████████████████████| 11/11 [00:01<00:00, 7.62it/s]
```
The pipeline can be moved to the GPU in much the same way as a standard PyTorch nn module:
```python
pipe.to("cuda");
```
Great! We'll define a Generator and set a seed for reproducibility. This will allow us to tweak our prompts and observe
the effect that they have on the generations by fixing the starting latents in the LDM model:
```python
import torch
generator = torch.Generator("cuda").manual_seed(0)
```
Now we're ready to perform our first generation! We'll use the same running example throughout this notebook, where we'll
condition the audio generations on a fixed text prompt and use the same seed throughout. The [`audio_length_in_s`](https://huggingface.co/docs/diffusers/main/en/api/pipelines/audioldm2#diffusers.AudioLDM2Pipeline.__call__.audio_length_in_s)
argument controls the length of the generated audio. It defaults to the audio length that the LDM was trained on
(10.24 seconds):
```python
prompt = "The sound of Brazilian samba drums with waves gently crashing in the background"
audio = pipe(prompt, audio_length_in_s=10.24, generator=generator).audios[0]
```
**Output:**
```
100%|███████████████████████████████████████████| 200/200 [00:13<00:00, 15.27it/s]
```
Cool! That run took about 13 seconds to generate. Let's have a listen to the output audio:
```python
from IPython.display import Audio
Audio(audio, rate=16000)
```
Sounds much like our text prompt! The quality is good, but still has artefacts of background noise. We can provide the
pipeline with a [*negative prompt*](https://huggingface.co/docs/diffusers/main/en/api/pipelines/audioldm2#diffusers.AudioLDM2Pipeline.__call__.negative_prompt)
to discourage the pipeline from generating certain features. In this case, we'll pass a negative prompt that discourages
the model from generating low quality audio in the outputs. We'll omit the `audio_length_in_s` argument and leave it to
take its default value:
```python
negative_prompt = "Low quality, average quality."
audio = pipe(prompt, negative_prompt=negative_prompt, generator=generator.manual_seed(0)).audios[0]
```
**Output:**
```
100%|███████████████████████████████████████████| 200/200 [00:12<00:00, 16.50it/s]
```
The inference time is un-changed when using a negative prompt \\({}^1\\); we simply replace the unconditional input to the
LDM with the negative input. That means any gains we get in audio quality we get for free.
Let's take a listen to the resulting audio:
```python
Audio(audio, rate=16000)
```
There's definitely an improvement in the overall audio quality - there are less noise artefacts and the audio generally
sounds sharper.
\\({}^1\\) Note that in practice, we typically see a reduction in inference time going from our first generation to our
second. This is due to a CUDA "warm-up" that occurs the first time we run the computation. The second generation is a
better benchmark for our actual inference time.
## Optimisation 1: Flash Attention
PyTorch 2.0 and upwards includes an optimised and memory-efficient implementation of the attention operation through the
[`torch.nn.functional.scaled_dot_product_attention`](https://pytorch.org/docs/master/generated/torch.nn.functional.scaled_dot_product_attention) (SDPA) function. This function automatically applies several in-built optimisations depending on the inputs, and runs faster and more memory-efficient than the vanilla attention implementation. Overall, the SDPA function gives similar behaviour to *flash attention*, as proposed in the paper [Fast and Memory-Efficient Exact Attention with IO-Awareness](https://arxiv.org/abs/2205.14135) by Dao et. al.
These optimisations will be enabled by default in Diffusers if PyTorch 2.0 is installed and if `torch.nn.functional.scaled_dot_product_attention`
is available. To use it, just install torch 2.0 or higher as per the [official instructions](https://pytorch.org/get-started/locally/),
and then use the pipeline as is 🚀
```python
audio = pipe(prompt, negative_prompt=negative_prompt, generator=generator.manual_seed(0)).audios[0]
```
**Output:**
```
100%|███████████████████████████████████████████| 200/200 [00:12<00:00, 16.60it/s]
```
For more details on the use of SDPA in `diffusers`, refer to the corresponding [documentation](https://huggingface.co/docs/diffusers/optimization/torch2.0).
## Optimisation 2: Half-Precision
By default, the `AudioLDM2Pipeline` loads the model weights in float32 (full) precision. All the model computations are
also performed in float32 precision. For inference, we can safely convert the model weights and computations to float16
(half) precision, which will give us an improvement to inference time and GPU memory, with an impercivable change to
generation quality.
We can load the weights in float16 precision by passing the [`torch_dtype`](https://huggingface.co/docs/diffusers/main/en/api/pipelines/overview#diffusers.DiffusionPipeline.from_pretrained.torch_dtype)
argument to `.from_pretrained`:
```python
pipe = AudioLDM2Pipeline.from_pretrained(model_id, torch_dtype=torch.float16)
pipe.to("cuda");
```
Let's run generation in float16 precision and listen to the audio outputs:
```python
audio = pipe(prompt, negative_prompt=negative_prompt, generator=generator.manual_seed(0)).audios[0]
Audio(audio, rate=16000)
```
**Output:**
```
100%|███████████████████████████████████████████| 200/200 [00:09<00:00, 20.94it/s]
```
The audio quality is largely un-changed from the full precision generation, with an inference speed-up of about 2 seconds.
In our experience, we've not seen any significant audio degradation using `diffusers` pipelines with float16 precision,
but consistently reap a substantial inference speed-up. Thus, we recommend using float16 precision by default.
## Optimisation 3: Torch Compile
To get an additional speed-up, we can use the new `torch.compile` feature. Since the UNet of the pipeline is usually the
most computationally expensive, we wrap the unet with `torch.compile`, leaving the rest of the sub-models (text encoders
and VAE) as is:
```python
pipe.unet = torch.compile(pipe.unet, mode="reduce-overhead", fullgraph=True)
```
After wrapping the UNet with `torch.compile` the first inference step we run is typically going to be slow, due to the
overhead of compiling the forward pass of the UNet. Let's run the pipeline forward with the compilation step get this
longer run out of the way. Note that the first inference step might take up to 2 minutes to compile, so be patient!
```python
audio = pipe(prompt, negative_prompt=negative_prompt, generator=generator.manual_seed(0)).audios[0]
```
**Output:**
```
100%|███████████████████████████████████████████| 200/200 [01:23<00:00, 2.39it/s]
```
Great! Now that the UNet is compiled, we can now run the full diffusion process and reap the benefits of faster inference:
```python
audio = pipe(prompt, negative_prompt=negative_prompt, generator=generator.manual_seed(0)).audios[0]
```
**Output:**
```
100%|███████████████████████████████████████████| 200/200 [00:04<00:00, 48.98it/s]
```
Only 4 seconds to generate! In practice, you will only have to compile the UNet once, and then get faster inference for
all successive generations. This means that the time taken to compile the model is amortised by the gains in subsequent
inference time. For more information and options regarding `torch.compile`, refer to the
[torch compile](https://pytorch.org/tutorials/intermediate/torch_compile_tutorial.html) docs.
## Optimisation 4: Scheduler
Another option is to reduce the number of inference steps. Choosing a more efficient scheduler can help decrease the
number of steps without sacrificing the output audio quality. You can find which schedulers are compatible with the
`AudioLDM2Pipeline` by calling the [`schedulers.compatibles`](https://huggingface.co/docs/diffusers/v0.20.0/en/api/schedulers/overview#diffusers.SchedulerMixin)
attribute:
```python
pipe.scheduler.compatibles
```
**Output:**
```
[diffusers.schedulers.scheduling_lms_discrete.LMSDiscreteScheduler,
diffusers.schedulers.scheduling_k_dpm_2_discrete.KDPM2DiscreteScheduler,
diffusers.schedulers.scheduling_dpmsolver_multistep.DPMSolverMultistepScheduler,
diffusers.schedulers.scheduling_unipc_multistep.UniPCMultistepScheduler,
diffusers.schedulers.scheduling_euler_discrete.EulerDiscreteScheduler,
diffusers.schedulers.scheduling_pndm.PNDMScheduler,
diffusers.schedulers.scheduling_dpmsolver_singlestep.DPMSolverSinglestepScheduler,
diffusers.schedulers.scheduling_heun_discrete.HeunDiscreteScheduler,
diffusers.schedulers.scheduling_ddpm.DDPMScheduler,
diffusers.schedulers.scheduling_deis_multistep.DEISMultistepScheduler,
diffusers.utils.dummy_torch_and_torchsde_objects.DPMSolverSDEScheduler,
diffusers.schedulers.scheduling_ddim.DDIMScheduler,
diffusers.schedulers.scheduling_k_dpm_2_ancestral_discrete.KDPM2AncestralDiscreteScheduler,
diffusers.schedulers.scheduling_euler_ancestral_discrete.EulerAncestralDiscreteScheduler]
```
Alright! We've got a long list of schedulers to choose from 📝. By default, AudioLDM 2 uses the [`DDIMScheduler`](https://huggingface.co/docs/diffusers/api/schedulers/ddim),
and requires 200 inference steps to get good quality audio generations. However, more performant schedulers, like [`DPMSolverMultistepScheduler`](https://huggingface.co/docs/diffusers/main/en/api/schedulers/multistep_dpm_solver#diffusers.DPMSolverMultistepScheduler),
require only **20-25 inference steps** to achieve similar results.
Let's see how we can switch the AudioLDM 2 scheduler from DDIM to DPM Multistep. We'll use the [`ConfigMixin.from_config()`](https://huggingface.co/docs/diffusers/main/en/api/configuration#diffusers.ConfigMixin.from_config)
method to load a [`DPMSolverMultistepScheduler`](https://huggingface.co/docs/diffusers/main/en/api/schedulers/multistep_dpm_solver#diffusers.DPMSolverMultistepScheduler)
from the configuration of our original [`DDIMScheduler`](https://huggingface.co/docs/diffusers/api/schedulers/ddim):
```python
from diffusers import DPMSolverMultistepScheduler
pipe.scheduler = DPMSolverMultistepScheduler.from_config(pipe.scheduler.config)
```
Let's set the number of inference steps to 20 and re-run the generation with the new scheduler.
Since the shape of the LDM latents are un-changed, we don't have to repeat the compilation step:
```python
audio = pipe(prompt, negative_prompt=negative_prompt, num_inference_steps=20, generator=generator.manual_seed(0)).audios[0]
```
**Output:**
```
100%|███████████████████████████████████████████| 20/20 [00:00<00:00, 49.14it/s]
```
That took less than **1 second** to generate the audio! Let's have a listen to the resulting generation:
```python
Audio(audio, rate=16000)
```
More or less the same as our original audio sample, but only a fraction of the generation time! 🧨 Diffusers pipelines
are designed to be *composable*, allowing you two swap out schedulers and other components for more performant counterparts
with ease.
## What about memory?
The length of the audio sample we want to generate dictates the *width* of the latent variables we de-noise in the LDM.
Since the memory of the cross-attention layers in the UNet scales with sequence length (width) squared, generating very
long audio samples might lead to out-of-memory errors. Our batch size also governs our memory usage, controlling the number
of samples that we generate.
We've already mentioned that loading the model in float16 half precision gives strong memory savings. Using PyTorch 2.0
SDPA also gives a memory improvement, but this might not be suffienct for extremely large sequence lengths.
Let's try generating an audio sample 2.5 minutes (150 seconds) in duration. We'll also generate 4 candidate audios by
setting [`num_waveforms_per_prompt`](https://huggingface.co/docs/diffusers/main/en/api/pipelines/audioldm2#diffusers.AudioLDM2Pipeline.__call__.num_waveforms_per_prompt)`=4`.
Once [`num_waveforms_per_prompt`](https://huggingface.co/docs/diffusers/main/en/api/pipelines/audioldm2#diffusers.AudioLDM2Pipeline.__call__.num_waveforms_per_prompt)`>1`,
automatic scoring is performed between the generated audios and the text prompt: the audios and text prompts are embedded
in the CLAP audio-text embedding space, and then ranked based on their cosine similarity scores. We can access the 'best'
waveform as that in position `0`.
Since we've changed the width of the latent variables in the UNet, we'll have to perform another torch compilation step
with the new latent variable shapes. In the interest of time, we'll re-load the pipeline without torch compile, such that
we're not hit with a lengthy compilation step first up:
```python
pipe = AudioLDM2Pipeline.from_pretrained(model_id, torch_dtype=torch.float16)
pipe.to("cuda")
audio = pipe(prompt, negative_prompt=negative_prompt, num_waveforms_per_prompt=4, audio_length_in_s=150, num_inference_steps=20, generator=generator.manual_seed(0)).audios[0]
```
**Output:**
```
---------------------------------------------------------------------------
OutOfMemoryError Traceback (most recent call last)
in ()
3 pipe.to("cuda")
4
----> 5 audio = pipe(prompt, negative_prompt=negative_prompt, num_waveforms_per_prompt=4, audio_length_in_s=150, num_inference_steps=20, generator=generator.manual_seed(0)).audios[0]
23 frames
/usr/local/lib/python3.10/dist-packages/torch/nn/modules/linear.py in forward(self, input)
112
113 def forward(self, input: Tensor) -> Tensor:
--> 114 return F.linear(input, self.weight, self.bias)
115
116 def extra_repr(self) -> str:
OutOfMemoryError: CUDA out of memory. Tried to allocate 1.95 GiB. GPU 0 has a total capacty of 14.75 GiB of which 1.66 GiB is free. Process 414660 has 13.09 GiB memory in use. Of the allocated memory 10.09 GiB is allocated by PyTorch, and 1.92 GiB is reserved by PyTorch but unallocated. If reserved but unallocated memory is large try setting max_split_size_mb to avoid fragmentation. See documentation for Memory Management and PYTORCH_CUDA_ALLOC_CONF
```
Unless you have a GPU with high RAM, the code above probably returned an OOM error. While the AudioLDM 2 pipeline involves
several components, only the model being used has to be on the GPU at any one time. The remainder of the modules can be
offloaded to the CPU. This technique, called *CPU offload*, can reduce memory usage, with a very low penalty to inference time.
We can enable CPU offload on our pipeline with the function [enable_model_cpu_offload()](https://huggingface.co/docs/diffusers/main/en/api/pipelines/audioldm2#diffusers.AudioLDM2Pipeline.enable_model_cpu_offload):
```python
pipe.enable_model_cpu_offload()
```
Running generation with CPU offload is then the same as before:
```python
audio = pipe(prompt, negative_prompt=negative_prompt, num_waveforms_per_prompt=4, audio_length_in_s=150, num_inference_steps=20, generator=generator.manual_seed(0)).audios[0]
```
**Output:**
```
100%|███████████████████████████████████████████| 20/20 [00:36<00:00, 1.82s/it]
```
And with that, we can generate four samples, each of 150 seconds in duration, all in one call to the pipeline! Using the
large AudioLDM 2 checkpoint will result in higher overall memory usage than the base checkpoint, since the UNet is over
twice the size (750M parameters compared to 350M), so this memory saving trick is particularly beneficial here.
## Conclusion
In this blog post, we showcased four optimisation methods that are available out of the box with 🧨 Diffusers, taking
the generation time of AudioLDM 2 from 14 seconds down to less than 1 second. We also highlighted how to employ memory
saving tricks, such as half-precision and CPU offload, to reduce peak memory usage for long audio samples or large
checkpoint sizes.
Blog post by [Sanchit Gandhi](https://huggingface.co/sanchit-gandhi). Many thanks to [Vaibhav Srivastav](https://huggingface.co/reach-vb)
and [Sayak Paul](https://huggingface.co/sayakpaul) for their constructive comments. Spectrogram image source: [Getting to Know the Mel Spectrogram](https://towardsdatascience.com/getting-to-know-the-mel-spectrogram-31bca3e2d9d0).
Waveform image source: [Aalto Speech Processing](https://speechprocessingbook.aalto.fi/Representations/Waveform.html).